DSS | Create Stream
The Create Stream dialog box is used to create a datastream that can collect large streams of specific device data in real time. Supported Cloud end points include AWS Kinesis and Azure Event Hubs. Following are the steps to create datastreams for AWS Kinesis:
- Make sure that you have created and logged in to your AWS account when using the AWS Kinesis as your transport stream.
- On the DataStream tab, click the CREATE STREAM button to open the Create Stream dialog box, shown below:
![]()
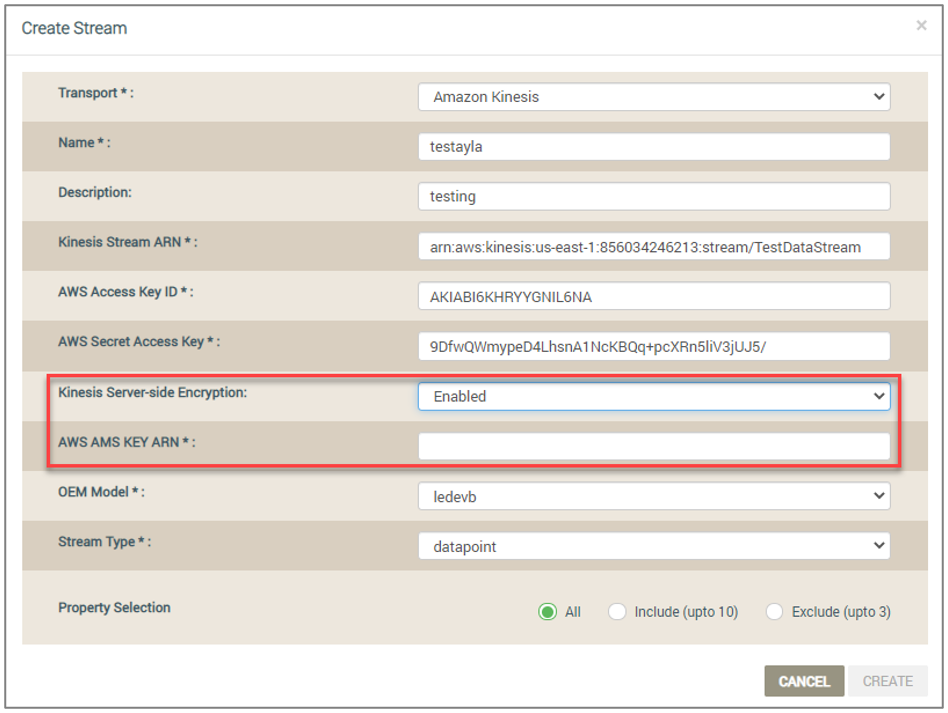
- In the Transport field, select Amazon Kinesis for the type of event bus to use as the streaming service. This displays all fields for this endpoint, as shown in the following example:

- Enter the information required for each field as follows:
- For Name, enter a name to identify this datastream.
- For Description, enter key details to describe the datastream. For example, you may want to enter the product type (i.e. dryers, boilers, etc.) associated with this datastream.
- For Kinesis Stream ARN, enter the Amazon Resource Name (ARN), which uniquely identifies an AWS resource across all of AWS. Click here for the general formats for ARNs and other related information.
- For AWS Secret Access Key, enter the Access Key ID provided with your account on the AWS Management Console. Click here to log in to your account to obtain this key.
- For Kinesis Server-side Encryption, select Enable or Disable from the drop-down list, depending on if you wish to have Kinesis Stream encrypt your incoming data. If you enable this encryption option, a new field displays, as shown below:
Click here for more information on this AWS encryption option.
- If you enabled encryption in the previous step (Step 4e), then for AWS AMS KEY ARN:, obtain this ARN key from your AWS account and then enter it in this field. When the encryption option is enabled, all users (consumers) will need to provide this ARN key when trying to read data from this stream. Click here for more information on this AWS key ARN.
- For OEM Model, select the OEM model to associate with this datastream. There is an option to associate the stream with all OEM models.
- For Stream Type, select the attribute that represents the specific type of data for this datastream:
- activation - - streams activation data for the devices that have the same OEM model associated with this datastream irrespective of whether these devices are registered or not. Activation event data is generated when the end users activate the device without registering it first.
- connection - streams all connection data for the devices that have the OEM model associated with this datastream.
- datapoint - streams data on the datapoints configured for the devices that have the OEM model associated with this datastream. If you select this option, the Property Selection field becomes enabled (as shown in the following step, Step 4i). This provides users with the ability to set up a datapoint event stream for specific property names.
- datapoint ack - streams data on acknowledgments that confirm whether or not property values were updated.
- location - streams geolocation data (i.e. latitude or longitude) for the devices that have the OEM model associated with this datastream.
- registration - streams registration-related data for the devices that have the OEM model associated with this datastream.
- If you selected datapoint for the stream type, then in the Property Selection field, select one of the following three options (described below) to include or exclude specific properties in this datapoint event stream. These are the properties defined in the Ayla Template for the OEM and OEM model specified for this datastream.
- All - includes all properties.
- Include (up to 10) - includes as many as 10 properties.
- Exclude (up to 3) - includes all properties except the those you specify to exclude.
If you do not select one of these options, all properties are included in the datapoint event stream by default.
If you select Include (up to 10) or Exclude (up to 3), the drop-down list shown below displays:

If you need to select more than 10 properties, but not all properties, create additional streams. Make sure that you select Datapoint for Stream Type (step 4h) and Include (up to 10) for Property Selection (step 4i).
- If you selected Include (up to 10) or Exclude (up to 3), then in the Property Selection field, select the specific properties you wish to include or exclude in the drop-down list. Once you have selected the properties, they are shown in the Property Selection field. Refer to the following example:

Notice that drop-list indicates when you have reached the maximum number of properties that can be added.
You can click the "X" next to the property name to unselect it, as shown below:

- Click CREATE.This adds the new datastream to the Streaming tab (shown below) and starts the stream by default. Notice that the option you chose for Property Selection is shown under Stream Type.

Please click here to let us know how we're doing. Thank you.